

3D Printing Brings Curriculum to Life in the Classroom
This week’s blog post features guest writer Kevin Self, a Physics Teacher at Lawrence Central High School in Indianapolis.
First of all, I want to say that I am not an artist. In addition, I am also not an expert at 3D printing. I have dabbled with 3D printing for about 7 years and I have always been a teacher who thinks students learn better when they have something in front of them instead of the good ole’ “Sit ‘N’ Git” curriculum. There is something about students creating something that attaches all the synapses in the brain and allows them to remember the content better.
My first experience with 3D printing started with helping with a 3D printer camp that was created by 1st Maker Space. I really had never seen a 3D printer work and wasn’t sure how grade school students would do with creating things that would be 3D printed. I liked the idea of students creating items and then printing them out, but I was worried about time constraints, monitoring the printers, etc. What amazed me was seeing the students watching their creations being printed in front of them and seeing their excitement when the product was finished. That was my “diving platform” moment to give it a try with my high school students.
I decided to write a grant through the school foundation at my school at the time. This was not a difficult thing to do as I knew that engagement was something the foundation was looking for and 3D printers were not located in a lot of schools at the time. I had reached out to 1st Maker Space to get a quote and I submitted this. About a month later, I received my notice that I had been given a grant to purchase 1 printer for my classroom. This was now the kickstart to start looking at different ways to incorporate this into my curriculum.
As a science teacher, the content lends itself to throw the STEM content together. I was teaching Integrated Chemistry/Physics at the time and knew that I had a project coming up for my students to learn about the periodic table and the elements. I had 118 students that I saw on a regular basis for my classes and there are 118 elements on the periodic table. Each student could research an element and give me some information about it (you know, write a paper about it). I knew that the essay about an element would bring moans and groans from the students, but giving them something that they could do “hands-on” with the element would bring some excitement. That would be my first project using 3D printing.
I started this project by introducing the students to Tinkercad. If you are unfamiliar with this program it is a FREE (yes, FREE) program that allows students to use different shapes and text to create 3D files. It is a very basic cad program, but it does the trick for anything I have done with my students. Some of my students were involved in PLTW courses and had used the Inventor cad program. These students were very useful in helping their peers with Tinkercad and I spent a couple of class periods (45 minute classes at the time) to allow students to create and explore. Then the real project would begin.
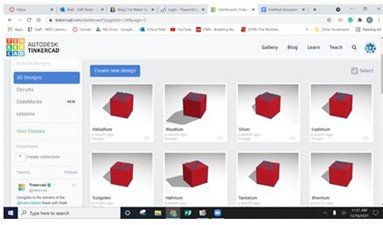
Tinkercad Website User Interface
The students were assigned their specific element for the periodic table. Each student would need the element name, atomic number, atomic mass, element abbreviation, and two facts about the element. This was the research part. After this, they would go to Tinkercad and add this information onto a 40 mm X 40 mm X 40 mm cube. On the top of the cube, they would put the name, atomic number, atomic mass, and abbreviation. On the side of the block, they would add the 2 facts about the element. Some of the students would have the letters sticking out the top of the block; some would cut their content into the cube. The facts would need to be cut into the side of the cube so that it wouldn’t interfere with the others. My grand project was to create a 3D printed periodic table that would have removable cubes for each element.

I was amazed by this project and how the students were eager to get their cubes turned into me. The creativity that students had in designing their cubes really knocked my socks off. I also decided to print the different element categories (Alkali Metals, Halogens, Noble Gasses, Transition Metals) in different colors so students understood the separations on the table. As we assembled the table, students wanted to take pictures of their blocks along with their peers.

As years have progressed, I have added different activities to my 3D projects for my classes. Students will soon be creating models of the mitosis using Tinkercad and will identify the various stages of this cell division process. Students have created gears to demonstrate rotational motion for physics. Branching out into other subject areas, students can create models of the terrain of Gettysburg that played a significant role in the Union victory on July 3, 1863. Students can create different geometric shapes and look at parabolas from a different perspective for math. English teachers can have students create figurines of characters from books.
The possibilities are endless. It is about taking risks, learning with students, and not being afraid to fail forward. There is curriculum content available for different content areas. Some of your students might even have ideas. Take the risk and explore. You won’t be disappointed in your results and your students will have a lot of fun!
Authored by Kevin Self. You can reach Kevin on Twitter @LCHSPhysics.
Interested in being a guest author for our blog? Email info@1stmakerspace.com to pitch your idea.